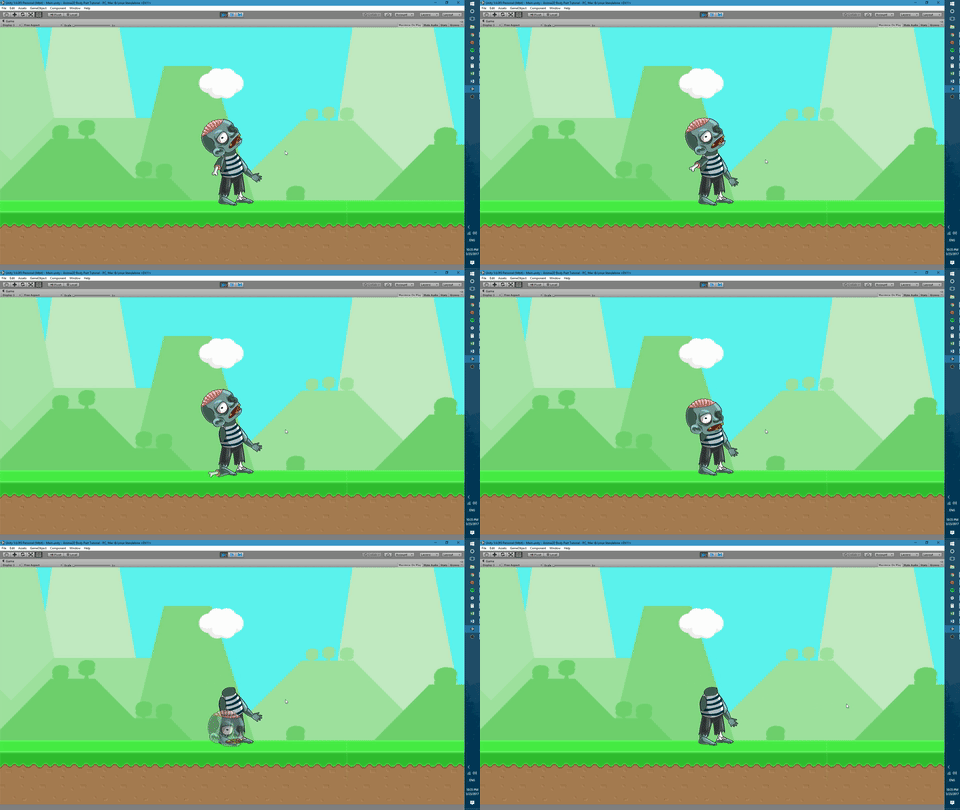
Hi, everyone! I’m back, this time we are doing something at a more intermediate level.We will be making a system that will allow you to make parts of your character “detachable” in an Anima2D character like shown below. We will be coding quite a bit, so I hope you are comfortable with C# and scratching your head a little.
The inspiration for the tutorial came after playing (a lot!) of Plants Vs Zombies 2. If you’ve ever played the game, the zombies, as they are losing health, start losing limbs. We will create a similar effect, with a very simple system.
Getting Started
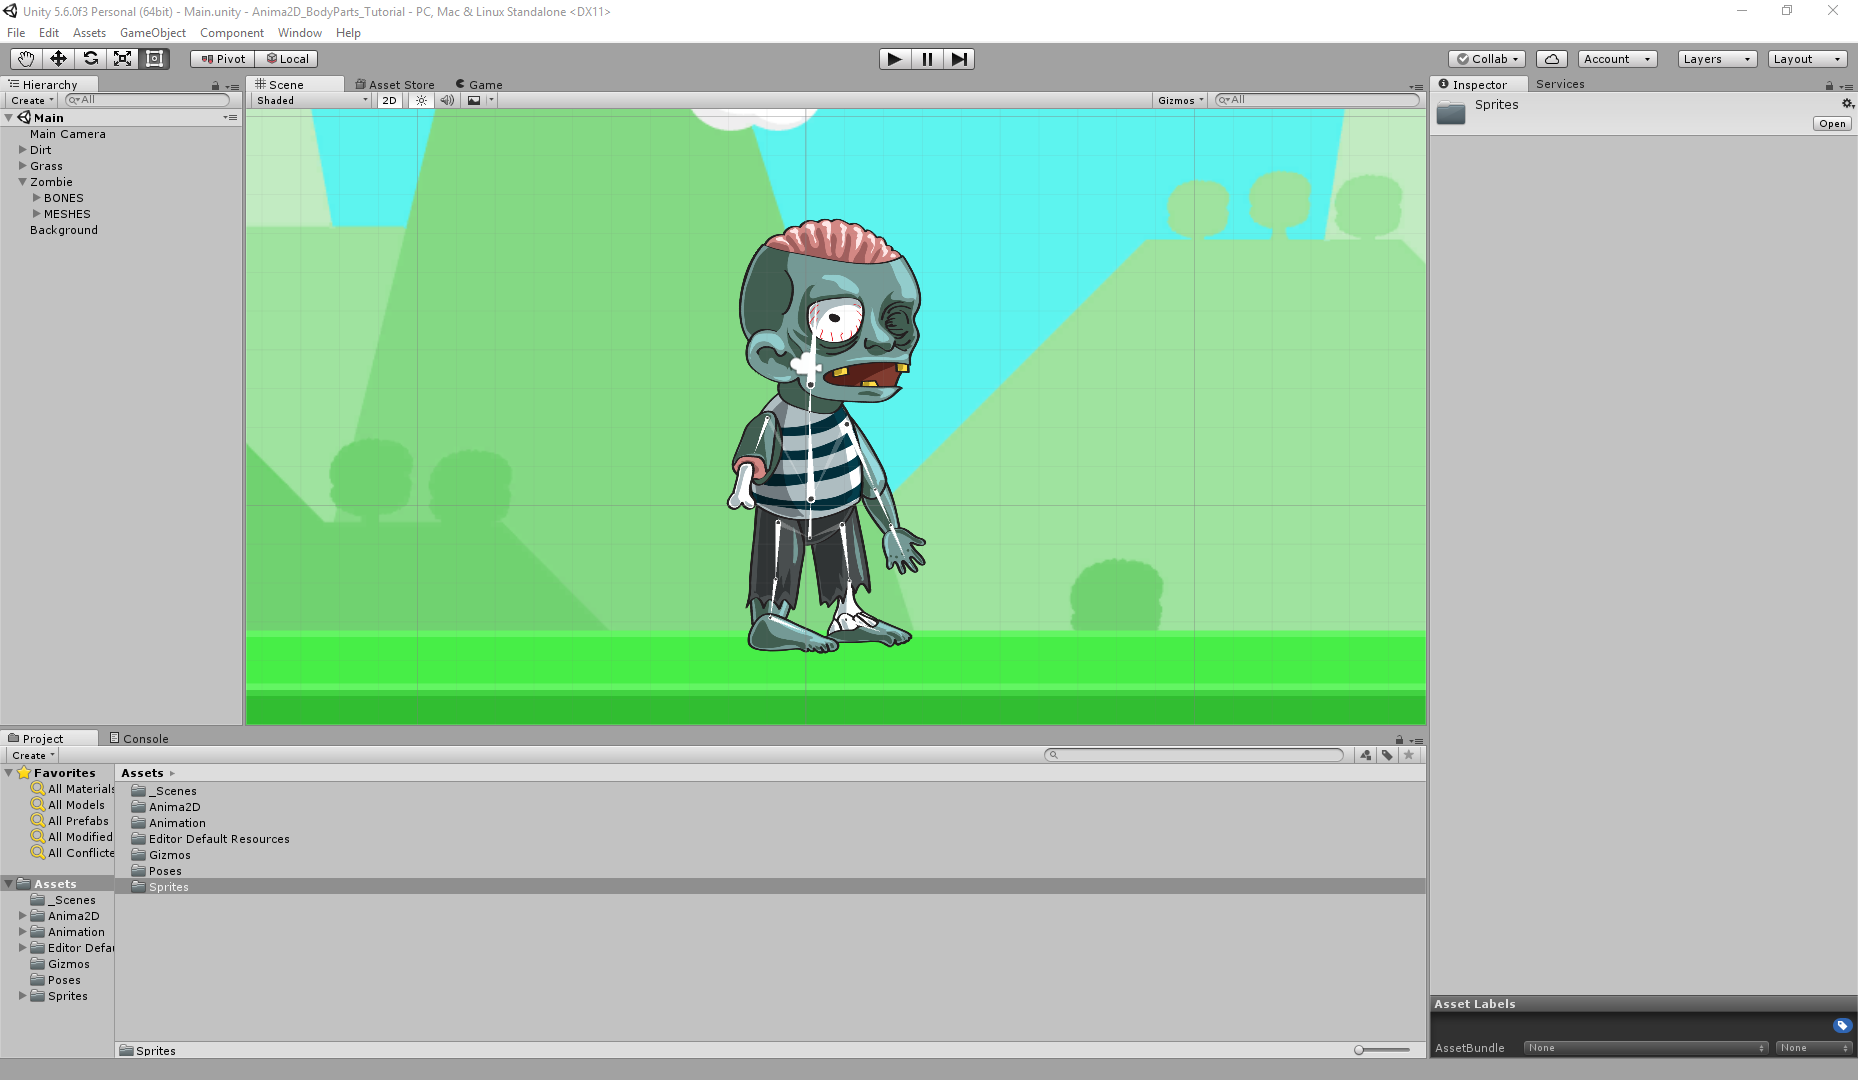
The first thing we need to do is to create a new project, make sure you set it to the “2D” preset, otherwise Anima2D can cause some trouble. After the project is open, we will import an Asset Package that has the character and the scene already set-up. To import it all you need to do is download it, and double-click on the file with Unity opened, a small window will appear, make sure everything is selected, then click on “Import”. After everything has been imported, navigate to the “_Scenes” folder, and open the “Main” scene. Then, if everything went right, you should see something like this:
Setting up the Limb Prefab
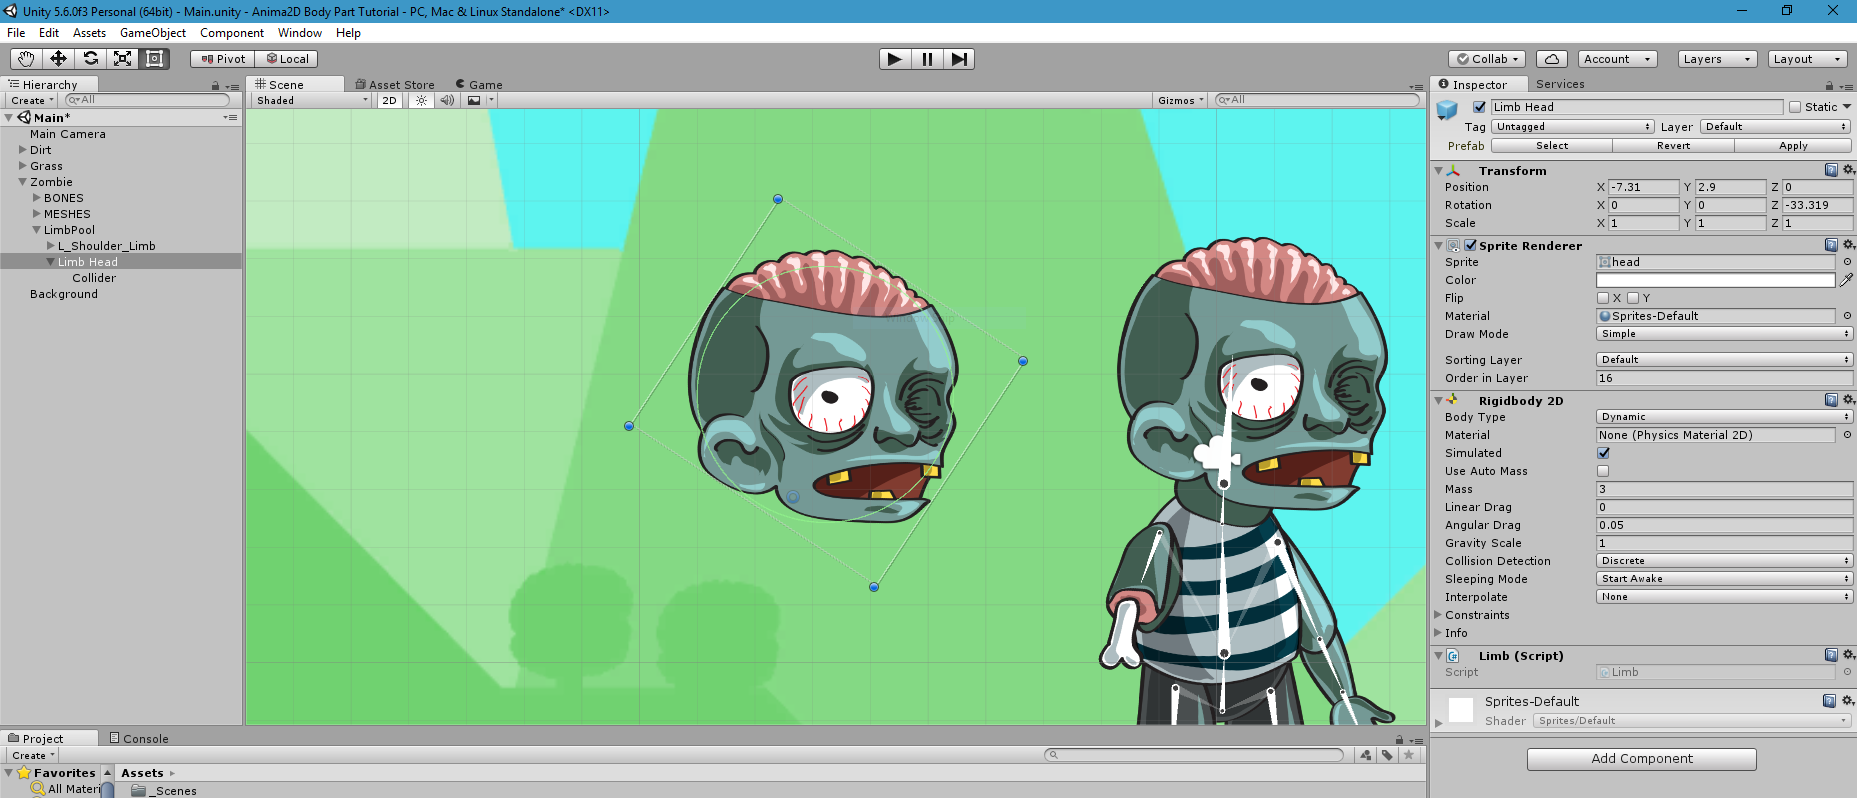
We will start by creating the “limbs” that will fall off the character:
- Create an empty GameObject and set it as a child of the Zombie GameObject.
- Change the name of the new GameObject to “Limb Pool”.
- We will be putting all the limbs here
- Now add another empty GameObject inside of the “Limb Pool” GameObject.
- Change the name to “Limb Head”.
- Add a RigidBody 2D and a Sprite Renderer.
- Set the mass of the rigidbody2D to 2.5
- Set the sprite to the sprite of the body part that we want to make fall, in this case, the sprite of the head (there are a few, we will use “head”).
- Create a collider in a separate child GameObject.
- That will allow us to rotate and move the collider freely.
- I used a circle collider 2D with a radius of 2.15.
- Click on Add Component ->; New Script, and call it “Limb”.
- Open the new C# Script for editing.
- This is the code:
using System.Collections;
using System.Collections.Generic;
using UnityEngine;
using Anima2D;

[RequireComponent(typeof(SpriteRenderer))]
[RequireComponent(typeof(Rigidbody2D))]
public class limb : MonoBehaviour {

   public IEnumerator FadeTo(float initValue, float duration, float timeUntilStart)
   {
      //Wait
      yield return new WaitForSeconds(timeUntilStart);
      //References and color
      SpriteRenderer renderer = GetComponent<SpriteRenderer>();
      Color newColor = new Color(1, 1, 1, 0);
      renderer.color = newColor;
      float alpha = renderer.color.a;

      for (float t = 0.0f; t < 1.0f; t += Time.deltaTime / duration) { //Lerp the alpha and apply it newColor = new Color(1, 1, 1, Mathf.Lerp(initValue, alpha, t)); renderer.color = newColor; //If the object is transparent, disable it if(t > .98f)
         {
            gameObject.SetActive(false);
         }

         yield return null;
      }
   }
}
Code Breakdown
[RequireComponent(typeof(Rigidbody2D))]

[RequireComponent(typeof(SpriteRenderer))]
The “RequireComponent()” attributes will make sure that the limb has a RigidBody2D and a SpriteRenderer.
public IEnumerator FadeTo(float initValue, float duration, float timeUntilStart)
The FadeTo coroutine takes 3 arguments, “initValue” will determine the alpha value from which we start fading, “duration” is, well, the duration of the fade, and “timeUntilStart” determines how long it waits until it starts to fade.
 //Wait
 yield return new WaitForSeconds(timeUntilStart);
 //References and color
 SpriteRenderer renderer = GetComponent<SpriteRenderer>();
 Color newColor = new Color(1, 1, 1, 0);
 renderer.color = newColor;
 float alpha = renderer.color.a;

 for (float t = 0.0f; t < 1.0f; t += Time.deltaTime / duration) { //Lerp the alpha and apply it newColor = new Color(1, 1, 1, Mathf.Lerp(initValue, alpha, t)); renderer.color = newColor; //If the object is transparent, disable it if(t > .98f)
    {
       gameObject.SetActive(false);
    }

    yield return null;
 }
Inside the coroutine, we first wait for a number of seconds, determined by “timeUntilStart”, we set up a reference to the Sprite Renderer, and we create a new color, white, with an alpha value of 0. We set the new color on the SpriteRenderer and then we copy the alpha value. Inside the for loop is where the magic happens. The for loop will reiterate for the duration argument. Inside of it, we use MathF.Lerp to interpolate the alpha value over time, the amount of interpolation is determined by t. We then assign the newColor to the renderer. Lastly, we check if the object is almost transparent, and if it is, we disable it. I went ahead and created another limb for the left arm, that is called “L_Shoulder_Limb”, using the same method as above.
If you did everything correctly, you should end up with something like this:
The RigidLimb Data Class
We will use a pure data class to store the references and GameObjects that each limb needs to do its function in the Anima2D character. In case you have never made a data class before, I recommend checking out this Unity tutorial. Now that we are on the same page, let’s make it happen!
- Go back into Unity, and create a C# script in the Assets folder, then open it.
- Delete the “MonoBehavior” inheritance and add the “[System.Serializable]” attribute above the class declaration, we will also need to add the “Anima2D” namespace by adding “using Anima2D;”.
- This is the code:
using System.Collections;
using System.Collections.Generic;
using UnityEngine;
using Anima2D;

[System.Serializable]
public class RigidLimb
{
    //Prefab of limb and the bone in the character
    public GameObject limbPrefab, limbBone;
    //The bodyMesh that corresponds to the bone in the character
    public SpriteMeshInstance limbBoneMesh;
    [HideInInspector]
    //Reference to SpriteRenderer
    public SpriteRenderer limbPrefabRenderer;
    [Range(0, 40)]
    //The forces applied in FallingLimb -> LooseNextLimb
    public float detachForce, detachRotationForce;
}
Data class breakdown
using Anima2D;

[System.Serializable]
These two lines are very important, with “using Anima2D;” we are adding the Anima2D namespace, that way we can access the class “SpriteMeshInstance” which is the core component found in the BodyMeshes in the character. The [System.Serializable] attribute will allow Unity to use this as a pure Data Class (it’s more complicated, but for our needs that explanation is all you need, check this out for more info).
public SpriteMeshInstance limbBoneMesh;
This reference will allow us to access the BodyMesh’s script, to change the color to transparent when we make the “swap”.
[HideInInspector]
//Reference to SpriteRenderer
public SpriteRenderer limbPrefabRenderer;
[Range(0, 40)]
//The forces applied in FallingLimb - LooseNextLimb
public float detachForce, detachRotationForce;
The [HideInInspector] attribute will hide the “limbPrefabRenderer” in the Editor, this will only be a reference to the SpriteRenderer component, so we don’t need to show it. The [Range] attribute shows a slider in Unity to adjust the value of the two variables below. “detachForce” is the force applied to the “Limb” GameObject when we make the effect, giving that “pop” effect. “detachRotationForce” is a the force we will add with “detachForce” to make the limb rotate as well.
The Falling Limb Script
Once we are done with our first limb, we can create the manager script that will control the limb’s coroutine and position, as well as make the BodyMesh transparent. The script will be attached to the “Zombie” character. So let’s get started!
- Select the “Zombie” GameObject and click on Add Component-> New Script, and call it “Falling Limb”, then open it.
- Here is the code:
using System.Collections;
using System.Collections.Generic;
using UnityEngine;

public class FallingLimb : MonoBehaviour {

    //Amount of time that it will fade, and the time it has to wait to start the fading
    [Range(0, 10)]
    public float fadeTime = 1.0f, timeUntilStart = 2.0f;
    //Reference colors
    Color color_a1 = new Color(1,1,1,1);
    Color color_a0 = new Color(0, 0, 0, 0);
    //List of RigidLimb
    public List<RigidLimb> rigidLimbList;
    //Index of current limb
    [SerializeField]
    int currentLimb = 0;
    bool isActive = true;

    private void Start()
    {
        ListInitialize();
        currentLimb = 0;
    }

    private void Update()
    {
        if (Input.GetMouseButtonDown(0))
        {
            LooseNextLimb();
        }
    }

    void LooseNextLimb()
    {
        if (isActive)
        {
            //Current limb in list
            RigidLimb limb = rigidLimbList[currentLimb];
            //Set the color
            limb.limbPrefabRenderer.color = color_a1;
            //Enable the limb and set position and rotation
            limb.limbPrefab.SetActive(true);
            limb.limbPrefab.transform.position = limb.limbBone.transform.position;
            limb.limbPrefab.transform.rotation = Quaternion.identity;
            //Apply the forces
            limb.limbPrefab.GetComponent<Rigidbody2D>().AddForce(new Vector2(0, limb.detachForce), ForceMode2D.Impulse);
            limb.limbPrefab.GetComponent<Rigidbody2D>().AddTorque(Random.Range(-limb.detachRotationForce,limb.detachRotationForce), ForceMode2D.Impulse);
            //Set the bodyMesh to be transparent
            limb.limbBoneMesh.color = color_a0;
            //Start FadeTo Coroutine
            limb.limbPrefab.GetComponent<Limb>().StartCoroutine(limb.limbPrefab.GetComponent<Limb>().FadeTo(1.0f, fadeTime, timeUntilStart));
            //Increase index
            currentLimb++;
        }
        //If we ran out of limbs, stop
        if (currentLimb >= rigidLimbList.Count)
        {
            isActive = false;
        }
    }

    private void ListInitialize()
    {
        for (int i = 0; i < rigidLimbList.Count; i++)
        {
            //Setup references and disable
            rigidLimbList[i].limbPrefabRenderer = rigidLimbList[i].limbPrefab.GetComponent<SpriteRenderer>();
            rigidLimbList[i].limbPrefab.SetActive(false);
        }
    }
}
Code Breakdown
First, let’s take a look at the variables we use:
    //Amount of time that it will fade, and the time it has to wait to start the fading
    [Range(0, 10)]
    public float fadeTime = 1.0f, timeUntilStart = 2.0f;
    //Reference colors
    Color color_a1 = new Color(1,1,1,1);
    Color color_a0 = new Color(0, 0, 0, 0);
    //List of RigidLimb
    public List<RigidLimb> rigidLimbList;
    //Index of current limb
    [SerializeField]
    int currentLimb = 0;
    bool isActive = true;
We use the [Range()] attribute to make Unity show a slider in the Inspector, it simply makes it look more neat. fadeTime is the duration of the fading, timeUntilStart is the amount of time that the limbs will “wait” until they start fading. color_a1 and color_a0 are two colors, one with 100% alpha value and 0% alpha, respectively. The RigidLimb list is the list that will contain all the references and limbs we will be using. currentLimb is the index of the current limb in the list. isActive is a boolean that we will use to determine if we have reached the end of the list.
private void Start()
{
    ListInitialize();
    currentLimb = 0;
}

private void ListInitialize()
{
    for (int i = 0; i < rigidLimbList.Count; i++)
    {
        //Setup references and disable
        rigidLimbList[i].limbPrefabRenderer = rigidLimbList[i].limbPrefab.GetComponent<SpriteRenderer>();
        rigidLimbList[i].limbPrefab.SetActive(false);
    }
}
In the Start() method we call ListInitialize() and we set currentLimb to 0. The ListInitialize() function will set-up the reference with the SpriteRenderer in each limb, as well as disabling the limbs.
void LooseNextLimb()
    {
        if (isActive)
        {
            //Current limb in list
            RigidLimb limb = rigidLimbList[currentLimb];
            //Set the color
            limb.limbPrefabRenderer.color = color_a1;
            //Enable the limb and set position and rotation
            limb.limbPrefab.SetActive(true);
            limb.limbPrefab.transform.position = limb.limbBone.transform.position;
            limb.limbPrefab.transform.rotation = Quaternion.identity;
            //Apply the forces
            limb.limbPrefab.GetComponent<Rigidbody2D>().AddForce(new Vector2(0, limb.detachForce), ForceMode2D.Impulse);
            limb.limbPrefab.GetComponent<Rigidbody2D>().AddTorque(Random.Range(-limb.detachRotationForce,limb.detachRotationForce), ForceMode2D.Impulse);
            //Set the bodyMesh to be transparent
            limb.limbBoneMesh.color = color_a0;
            //Start FadeTo Coroutine
           limb.limbPrefab.GetComponent<Limb>().StartCoroutine(limb.limbPrefab.GetComponent<Limb>().FadeTo(1.0f, fadeTime, timeUntilStart));
            //Increase index
            currentLimb++;
        }
        //If we ran out of limbs, stop
        if (currentLimb >= rigidLimbList.Count)
        {
            isActive = false;
        }
    }
Now where the magic happens, the LooseNextLimb() function does the following:
- Check if isActive is true, if it is, we carry on.
- We create a RigidLimb variable, mainly to make the code more readable, we then assign the current limb in the list to it.
- We set the color of the limbPrefab’s renderer to 100%.
- We set the limbPrefab to active, and we match the position and rotation with those of the limbBone.
- We then add the forces to make the “pop” effect with AddForce(), for the upwards force, and AddTorque() to make it rotate.
- We make the real BodyMesh be transparent.
- We call the coroutine FadeTo that is inside the limb.
- We increase currentLimb.
- If currentLimb is bigger than the number of limbs, we set isActive to false.
The script is relatively simple, so hopefully, your big minds can come up with ways to tweak it and improve it.
The LooseNextLimb() function will trigger with a left click on the mouse, as shown below.
private void Update()
    {
        if (Input.GetMouseButtonDown(0))
        {
            LooseNextLimb();
        }
    }
If you wanted to make it so that whenever the zombie gets hit, for example, it looses the next limb, you should make the call to the function from OnCollisionEnter2D or the method that best fits your need.
Using the System
With all the script and limbs set-up, we can start actually making some limbs pop!
Let’s jump to the FallingLimb script that is in the “Zombie” GameObject, then let’s set the list’s size to 2 (depending on how many limbs you have). Once the list has opened, let’s go into the “Element 0” and click to open the dropdown. Inside the “Limb Prefab” slot we will drag the limb that we created. In my case, I will drag the left shoulder limb (remember that the order we put the limbs in the list DOES matter). In the Limb Bone slot, we will drag the bone that corresponds to that BodyMesh, in this case, the L_Arm bone. The last reference will be the BodyMesh that corresponds to the Sprite in the Limb, in this case, the L_Shoulder BodyMesh. Last but not least, let’s set the forces, I will use 6 for “Detach Force” and 3 for “Detach Rotation Force”.
To add more limbs, simply repeat. If everything went ok, you should have something like this:
And that is it! You are now ready to play around with it, and come up with even better ways to use it!
Downloads
- Asset Package: https://drive.google.com/open?id=0B8Zl1dvvnT64blN2Z3V3c1BxeTA
- Scripts: https://drive.google.com/open?id=0B8Zl1dvvnT64VlliSno1Vi1PQnc
- Zombie Sprite: https://free-game-assets.itch.io/
- Background and Tiles: https://bayat.itch.io/platform-game-assets


0 Comments